Tuesday, May 21, 2013

Banana Split Dessert

Banana Split Slice was a favorite dessert of ours decades ago.  The original recipe had a layer which was heavy on butter and included raw eggs.  I've switched it up a little and it now has a cream cheese layer.  The maraschino cherry on top has been replaced by strawberries.  Those who sampled my updated version of the old favorite gave it a thumbs up. 


Crust:
  • 1/2 cup butter or margarine, melted
  • 1 1/2 cups graham wafer crumbs
  • 2 Tablespoons brown sugar

Filling:
  • 12 oz. / 375 g cream cheese, softened
  • 1 cup icing sugar
  • 1 1/2 cups whipping cream 
  • 3 tablespoons granulated sugar
  • 1 1/2 teaspoons vanilla
  • 19-20 oz. can crushed pineapple, well drained*
  • 4 bananas, sliced
  •  1 box instant vanilla pudding, 4 serving size
  • 1 1/2 cups milk
  • Hershey's chocolate sauce
  • chopped peanuts
  • strawberries
  1. Combine butter, graham wafer crumbs and sugar.  Press into a 9" x 13" pan.  Bake at 350°F for 10 minutes.
  2. Whip cream until thick.  Sprinkle with sugar and add vanilla.   Continue to beat until peaks form. Set aside.
  3. Cream together cream cheese and icing sugar.  Mix in half of the whipped cream.  Spread mixture over graham cracker crust.
  4. Spread crushed pineapple over cream cheese layer.  
  5. Arrange banana slices evenly over the pineapple.
  6. Combine pudding mix with milk and mix until blended and beginning to thicken.  Spread over banana layer.
  7. Spread remaining whipped cream over the top.
  8. Refrigerate for at least 4 hours. 
  9. Before serving, drizzle with chocolate sauce, sprinkle on peanuts and  top with sliced strawberries.
* Reserve the pineapple juice and soak the banana slices in it before adding to the dessert to prevent browning.

Serves 15.

Gluten-free version: Use a gluten-free crumb base (such as this) or use the recipe as given substituting 1 1/2 cups crushed almonds for the graham cracker crumbs or buy the commercial gluten free graham wafer crumbs.



Wednesday, May 15, 2013

Smartie Cookie Pizza

It is simply a giant cookie...also called a cookie pizza or a cookie-cake.  It's a fun dessert for all ages...is easy to transport to a party or picnic and fun to give as a gift.  Write a message on it with icing and serve it for any occasion!


Ingredients:
  • 1 cup butter or margarine
  • 1 1/2 cups brown sugar
  • 2 eggs
  • 2 teaspoons vanilla
  • 2 1/2 cups all-purpose flour
  • 1 tsp baking soda
  • 1 tsp salt
  • 2 cups semi sweet chocolate chips
  • Smarties or M and M's to decorate
Instructions:
  1. Preheat oven to 350° F. 
  2. Line a 14-inch round pizza pan with a circle of parchment.
  3. Cream butter and sugar with mixer until smooth. 
  4. Beat in the eggs and vanilla. 
  5. Add flour, baking soda and salt together. Mix until smooth.
  6. Fold in chocolate chips.
  7. Put the dough into the pizza pan and press it into a circle...leaving a generous 1 inch gap around the rim.
  8. Press smarties into the top...as desired.
  9. Bake on center rack for 20 minutes or until cookie is golden and set.
 

Friday, May 10, 2013

Crunchy Baked Chicken Tenders

We had chicken dinner on Sunday.  It looked nothing like the Sunday chicken dinner that I grew up with...with no stuffing, no mashed potatoes and no gravy. But there were delicious strips of lean chicken breast...moist and tender on the inside with a crunchy topping.  And while they were baking...I baked a pan of potato strips alongside.  In twenty minutes time, we had a healthy plate of chicken strips and oven fries in the comfort of our own home.  That is fast food at it's finest!


  • 1 1/2 pounds chicken tenders (chicken breast strips)
  • 1 cup buttermilk
  • 1/2 teaspoon crushed red chili pepper
  • 1/2 teaspoon garlic salt
  • 1 1/2 cups panko bread crumbs
  • 1 cup grated parmesan cheese
  • 1/2 teaspoon salt 
  • 1/4 teaspoon cayenne pepper
  • 1/8 teaspoon black pepper
  1. Mix buttermilk, crushed peppers and garlic salt together in a shallow dish (like a pie plate) and add chicken tenders...turning pieces to coat.  Cover and set aside to marinade for one hour or overnight.
  2. Combine panko bread crumbs, parmesan cheese, salt, cayenne and pepper.  
  3. Drain chicken tenders and roll in the bread crumb mixture, pressing to coat on all sides.
  4. Bake on a rack (cooling rack) that has been placed on a baking sheet at 450°F for 15-20 minutes or until golden.
Serve immediately alongside oven baked fries, fresh veggies and dips of your choice. (Ranch and honey mustard pictured above).

Tuesday, April 30, 2013

Cauliflower Cheesecakes

We have a new favorite vegetable side dish over here...cheesy cauliflower cakes.  They are delicious, nutritious...and come with a bit of heat.  Try them.  I think you'll like them!

  • 1 medium-sized head cauliflower
  • 1/2 cup shredded cheddar cheese 
  • 2 eggs, beaten
  • 1/2 cup Panko bread crumbs
  • 1/2 teaspoon cayenne pepper (or to taste)
  • 1/4 teaspoon salt 
  • 1 tablespoon olive oil

  1. Cut cauliflower into florets and cook  until tender (8-10 minutes).
  2. Drain.  Mash cauliflower while warm.  
  3. Cool slightly; then stir in cheese, eggs, bread crumbs and seasonings.
  4. Heat olive oil in non-stick skillet over medium heat.
  5. Form the cauliflower mixture into patties (about 3 inches in diameter).
  6. Cook until set and golden in colour...about 2 minutes per side. 

Monday, April 22, 2013

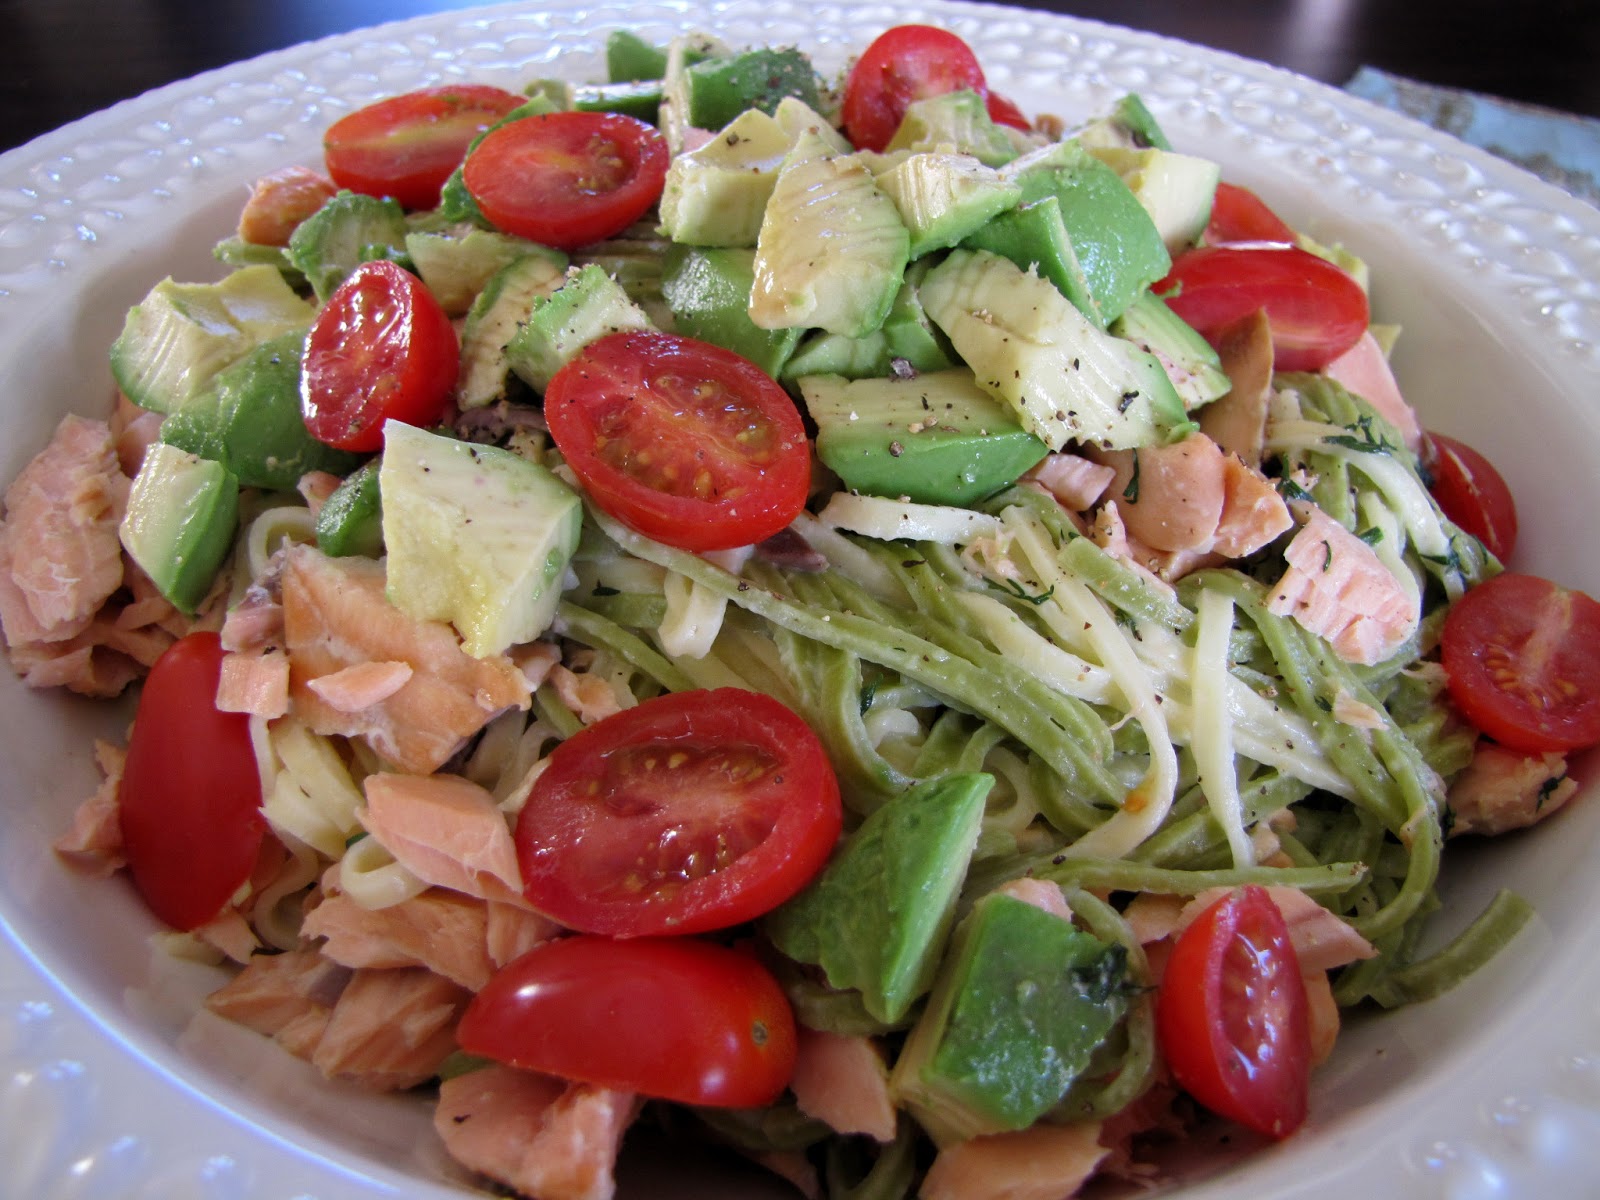
Salmon and Avocado Linguine

Salmon and pasta are the perfect duo!  Add fresh dill, lemon, tomatoes and avocado and enjoy a delicious one-bowl pasta dish.  It's a favorite over here.

 
  • 1 - 350 g package fresh linguine
  • 1 tablespoon olive oil
  • 1/2 cup cream
  • 1/3 cup grated Parmesan cheese
  • 2 tablespoons chopped dill
  • 1 1/2 cups salmon pieces (baked, grilled, or smoked)
  • 1-2 tablespoons lemon juice
  • 1 avocado, roughly chopped
  • 6-8 cherry tomatoes, halved
  1. Cook pasta in a large pot of boiling, salted water until tender. Drain.
  2. Add olive oil and stir to coat.
  3. Return to pan.
  4. Add cream, Parmesan, dill and salmon pieces to pasta.
  5. Cook, tossing gently, over low heat for several minutes or until heated through. 
  6. Remove from heat. 
  7. Stir in lemon juice and season with salt and pepper. 
  8. Place linguine in large serving bowl.
  9. Place avocado pieces and cherry tomatoes on top.*
  10. Garnish with freshly ground pepper and additional dill (optional).

*The avocado pieces and tomatoes can be added along with salmon in step four, but they tend to get mushy as they are stirred.  We prefer to add them to the completed pasta dish.

Tuesday, March 26, 2013

Paska Buns

Paska (based on the Hebrew word for passover) is a rich, citrussy sweet bread...baked in loaves or rolls of all shapes and sizes and decorated with icing and sprinkles. It is a traditional Easter bread...baked by many generations before me. There are enough paska lovers in our family...that I think tradition that will carry on!

The Saturday before Easter was paska baking day in my childhood home.  It was mostly baked in loaf pans...and on Easter Sunday we enjoyed the nicely decorated fresh paska.  Though I still bake some in loaf form...we prefer paska buns over here.  They are easy to transport and share with friends and neighbours.  The following recipe uses instant yeast for simplicity.
 

  • 1 1/2 cups milk
  • 1/2 cup butter
  • 1 small lemon, zest and juice
  • 1 small orange, zest and juice
  • 4 eggs, well beaten
  • 1 cup sugar
  • 1 teaspoon salt
  • 2 tablespoons instant yeast *
  • 7-7 1/2 cups flour , approximately

  1. Scald milk and butter in microwave for about 2 minutes. Stir to melt butter.
  2. Grate rind of lemon and orange. Then squeeze juice of each.
  3. Combine all above ingredients in large bowl, together with beaten eggs, sugar and salt.  Mix well. 
  4. Combine instant yeast with 4 cups flour and add to liquids.  Beat until smooth.
  5. Continue adding flour, one cup at a time until the dough no longer sticky, but still quite soft.
  6. Knead for several minutes.
  7. Let rise in a warm spot until doubled in size.
  8. Form small balls (the size of dinner rolls) and place on well greased pans.
  9. Allow to rise once more until doubled in size about 1 1/2 hours. 
  10. Bake at 325°F for about 15-20 minutes or until golden brown. 
  11. Remove to wire racks to cool.
  12. Frost with the icing of your choice...and top with sprinkles. 
Yield: 3 dozen paska buns
 * If you have active dry yeast, you might want to use Lovella's recipe, which is very similar to this one.

Yeast doughs that are heavy on milk, butter and eggs tend to rise a little slower.  Have patience!


Friday, March 15, 2013

Meyer Lemon Loaf

The Meyer lemon (named after Frank Meyer in 1908) originated in China...and is a cross between a lemon and a mandarin orange. It is rounder and more orange than the typical lemon and somewhat sweeter.  It has become very popular in recent years after being featured by the likes of Martha Stewart.  Though it was previously mostly a backyard fruit...it is now being grown commercially on a wide scale in California.  I'm working my way through a basket of Meyer lemons over here...and enjoying them every which way.  Here's a moist and yummy lemon loaf.


  • 1 cup butter, softened
  • 2 cups sugar
  • 4 eggs
  • 3 cups flour
  • 1/2 teaspoon baking powder
  • 1/2 teaspoon baking soda
  • 3/4 teaspoon salt
  • 3/4 cup buttermilk
  • zest of 3 Meyer lemons
  • 1/3 cup Meyer lemon juice *
  1. Preheat oven to 350 °F.  Grease two loaf pans (abvout 4 x 8 inches each).
  2. Cream butter and sugar with mixer until until light and fluffy.
  3. Add eggs, one at a time, beating well after each addition.
  4. Combine flour, baking powder, baking soda and salt in a medium sized bowl.
  5. In a small bowl, combine buttermilk, lemon juice and zest.
  6. With mixer on low, add flour mixture and liquids alternately in three additions.
  7. Beat just until smooth.
  8. Divide batter equally between the two loaf pans, spreading to smooth the top. 
  9. Bake for 50 minutes, or until toothpick inserted in center comes out clean.
  10. Cool for about 15 minutes, before removing from pan.
  11. Allow cake to cool completely on a rack before glazing.
*Zest the lemons before extracting juice.
Glaze:
  • 2 cups icing sugar
  • 3-4 tablespoons Meyer lemon juice
  1. Stir icing sugar and lemon juice until smooth.  Glaze should be pourable but not too thin.
  2. Set rack with loaves over parchment paper and pour glaze over cakes, allowing it to run down the sides.