Monday, December 30, 2013

Salted Toffee Pretzel Bark


We had a favorite holiday treat over here...that got changed up a little this year.  My recipe for Chocolate Almond Roca slice underwent a makeover...and is now Salted Toffee Pretzel Bark.  With a granddaughter who has nut allergies...this works much better.  And we love it!  The first recipe disappeared quickly...so I made another batch to take us through New Year's.  If you like a toffee and chocolate combination with a touch of salt...this is for you. It's not too late to make up some treats for your New Year's celebrations.
 
  • 1 bag mini pretzels (you will need 4 or 5 cups)
  • 1 cup butter (the real thing)
  • 1 cup brown sugar
  • 1 340 gr / 12 oz. bag semi-sweet chocolate chips (about 2 cups)
  • Sea salt (optional)
  1. Line 11 x 17 inch bar pan with parchment paper.
  2. Cover the bottom with a layer of pretzels.
  3. Combine butter and brown sugar in a small saucepan over medium heat, and bring to a full boil while stirring.
  4. Pour carefully over the pretzels.
  5. Place in a 350° F oven for 8 minutes, or until bubbly all over.
  6. Remove from oven and sprinkle evenly with chocolate chips.
  7. Let sit for a minute to melt the chocolate. 
  8. Then smooth surface with a spatula.
  9. Sprinkle with sea salt if desired.
  10. Cool to room temperature.
  11. Place in freezer for 10-15 minutes to harden chocolate topping.
  12. Remove from the pan and break into bite sized portions.  
* These can easily be cut into bars as well.  Lift the hardened confection onto a cutting board and cut into bars using a sharp knife or pizza cutter.

Friday, December 6, 2013

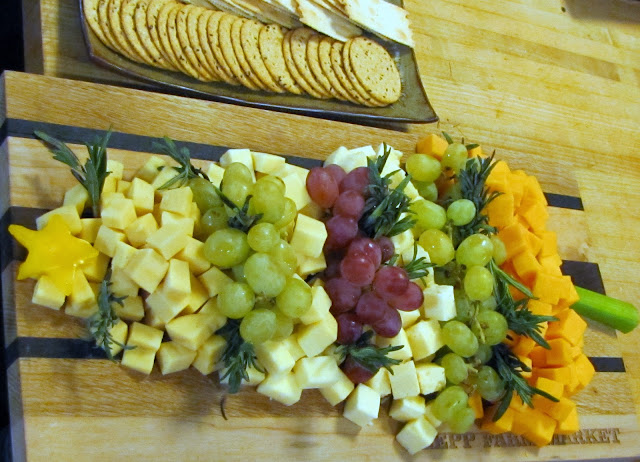
Christmas Tree Cheese Platter


Are you looking for a fun yet simple appetizer idea for the holiday season?  I have a cheese tray that doesn't take long to put together...and will be the perfect addition to your festive buffet
  • 1/2 lb / 200 g Cheddar Cheese, cut into 3/4-inch cubes
  • 1/2 lb / 200 g  Smoked Gouda Cheese, cut into 3/4-inch cubes
  • 1/2 lb / 200 g Monterey Jack Cheese, cut into 3/4-inch cubes
  • 1/2 lb / 200 g 200 g Swiss  Cheese, cut into 3/4-inch cubes
  • 1 lb (450 g) each seedless green and red grapes
  • 1 pkg (40 g) fresh thyme or rosemary sprigs
  • 1 stalk celery
  • 1 yellow pepper (use star-shaped cookie cutter to cut out tree-topper) 
  1. Arrange cheese cubes and grapes in rows on a large wooden board or platter in a Christmas tree shape.
  2. Add sprigs of greenery.
  3. Cut tree trunk (2 or 3 inches) from celery stalk and place at bottom of tree.
  4. Place star-shaped piece of yellow pepper at top of tree.
  
On Wednesday night we hosted a cooking class featuring Old Fashioned Christmas Cookies at Lepp Farm Market.  The guests enjoyed hot apple cider and appetizers while the cookie demonstrations took place.  We prepared a Christmas Tree Cheese Platter for them...using cheeses that the market deli had chosen and cubed for us in advance.   But one could substitute any cheese.  A small cheese ball also works well as a tree-topper.  Add the best crackers...and enjoy your party-worthy cheese platter!

Enjoy!


Monday, November 25, 2013

Spiced Pumpkin Layer Cake with Cream Cheese Frosting


We stopped by to visit a cousin in California a few weeks ago...as we were traveling through.  It felt like summer...and we had lunch in the shade of an outdoor gazebo.  For dessert she brought out a moist and delicious frosted pumpkin layer cake.  I'm sharing it with you today...my version of Linda's spiced pumpkin cake dessert!   It may still feel like summer where you are...or maybe winter has already hit hard...but the calendar still says autumn.  Let's enjoy the pumpkin!

Pumpkin Layer Cake:
  • 2 cups flour
  • 1 1/2 teaspoons baking soda
  • 1 teaspoon baking powder
  • 1 teaspoon salt
  • 2 teaspoons cinnamon
  • 1/2 teaspoon nutmeg
  • 1/4 teaspoon cloves
  • 3 eggs
  • 2 cups sugar
  • 1 cup oil
  • 2 teaspoons vanilla
  • 1 can 14 oz/398 ml pumpkin purée (remove two tablespoons to add to frosting if desired*)
  • 1 14 oz. can crushed pineapple (do not drain)
  • 1 cup sweetened flaked coconut
  • 1/2 cup golden raisins
  1. Whisk together flour, baking soda, baking powder, salt and spices.
  2. In mixing bowl, beat together eggs, sugar and oil.  
  3. Add vanilla and pumpkin purée and mix until smooth.
  4. Add dry ingredients and stir until combined.
  5. Stir in pineapple, coconut and raisins.
  6. Pour into two 9-inch cake pans, sprayed with oil and lined with parchment paper.
  7. Bake at 350°F for 35-45 minutes...or until toothpick inserted in center comes out clean.
  8. Cool for 15 minutes.  Then remove from pans, invert onto cooling rack.
  9. Frost with cream cheese icing when cool.

Cream Cheese Frosting:

  • 1/3 cup butter
  • 1 (250 gr) package cream cheese
  • 2 tablespoons pumpkin purée, optional
  • 1 teaspoon vanilla extract
  • 3 cups icing sugar
  • 1-2 tablespoons milk

  1. Cream butter and cream cheese together until smooth.
  2. Beat in pumpkin and vanilla.
  3. Add icing sugar one cup at a time, beating until smooth.
  4. Add milk as needed to get desired consistency.
*the pumpkin purée adds a creamy colour to the frosting


Friday, November 15, 2013

Spanish Rice

I always enjoyed eating at my mom-in-law's table...and Spanish Rice was a dish she served often.  I've made a few changes to her recipe over the years (adding salsa for some zip and using diced tomatoes instead of tomato soup)...but whenever I make Spanish Rice I am always reminded of 'mom'.  Serve with green salad and warm dinner rolls for the perfect fall meal.

  • 1 1/2 cup long-grain rice, white or brown...uncooked
  • 1 teaspoon salt
  • 6-8 slices bacon*
  • 1/2 cup chopped onion
  • 1 green bell pepper, chopped
  • 1 398 ml can diced tomatoes (about 1 pound)
  •  1/2 cup hot salsa
  • 1/8 teaspoon black pepper
  1. Cook rice according to directions...adding salt if desired.
  2. Fry bacon in large skillet until crisp.
  3. Remove bacon from skillet and pour off all but two tablespoons of drippings.
  4. Add chopped onion and green pepper to skillet; saute until tender.
  5. Stir in cooked rice, bacon, diced tomatoes, salsa and pepper.
  6. Cook uncovered on low heat for about 15 minutes.
Serves 4-6

*Variation: Omit bacon and add 2 cups of  cooked ham. 


Saturday, October 26, 2013

It's a Piece of Cake!

I thought I'd use this Saturday post to share some simple cake decorating tips with you.

Birthdays are a special time for kids...
and they love nothing better than having a unique cake to mark the occasion.
And guess what?
They are easy to make...
using standard cakes cut into various shapes...
frosted and decorated.
One does not need to be skilled cake decorator...
or have fancy pans!

With a little inspiration...
anyone can turn out a fun edible centerpiece for that next birthday celebration!

I have a book called Cakes for Kids by Matthew Mead...
which is a great guidebook.
But for the most part...
one can google any theme these days...
and find ideas for a cake to go with it. 


My five-year-old granddaughter requested a treasure chest cake for her birthday...
a few weeks ago.

Betty Crocker had a treasure chest cake on-line.
That was my guide and I made changes as I went along.
I used a chocolate cake mix...
baked it in a 9 x 13 inch pan...
and cut it up as Betty suggested.
I added a cardboard base (covered with foil) under the 'lid'...
thinking that would make it easier to remove for cutting.
I used a chocolate butter cream frosting...
but I'm sure frosting from the can would work just as well.
The straps on the treasure chest are strips of fruit roll-ups.
Candy necklaces and foil wrapped candies work great.
Gold foil-covered chocolate coins are a must!

Maggie loved her cake!
My oldest two grands (twin girls) had the same cake for their fifth birthday...
almost seven years ago.

Another grand was obsessed with ducks...


...so she got a ducky cake for her 2nd birthday not long ago.
Fun...and simple!


The ladybug cake was baked in a Pyrex bowl...
the head in a custard cup.
The spots are wee Oreo cookies.
I checked out google images and copied what I liked.


A frog cake for a second birthday.
Very easy...
using two layers and two cupcakes.


One year the birthday girl wanted a princess cake.
I used mini bundt pans for the skirt...
and inserted a wee princess in the center of each cake.
The grandgirlies each had a small princess cake...
the two grandsons each had a frog cupcake.
 

The monkey is for the guests to enjoy...
the banana is for the birthday boy!


The dinosaur cake was made for my grandson Micah's first birthday...


My other grandson had a Lego cake for his sixth birthday...
easily created by cutting a 9 x 13 inch cake into blocks...
and using large marshmallows (cut in half crosswise) for the 'knobs'.


The princess castle cake was for my twin grand daughters' birthday many years ago...
a copykat version of one I found on-line.


A bundt cake with a doll tucked in the center...
was a simple solution for a strawberry shortcake themed party.
And that was for a girl who has an allergy to strawberries!


Raggedy Ann was made following a photo I saw on-line.
The head was baked in a 1 1/2 quart Pyrex casserole...
the body is a round cake layer cut in half .
Pull-apart red licorice twist work great for Ann's hair.


The Teddy Bear cake was a cake baked in four baking pans...
a 1 1/2 quart casserole for the head, 
a large custard dish for the nose, 
and two small custard dishes for the ears.
The bow tie is made of fruit leather.


The inspiration for the Blues Clues cake came from here...
and was simply a 9 x 13 inch cake cut in the shape of a dog's head.
The blue sparkles put on the finishing touch.


The Hello Kitty was made following directions given here...
also cut from a 9 x 13 inch cake.

Those are a few of the 'cut-up' cakes that my grands have enjoyed these past years.

None of them required any training in cake decorating...
or any specialty pans.

If you want vibrant coloured frosting...
be sure to use gel colours...
available with cake decor supplies anywhere.

To eliminate cake crumbs in your icing as you decorate...
cover the entire cake with a skim coat of icing and chill until firm...
maybe 30 minutes.

Baby Carriage Cake ~ with instructions


Use your imagination...
and have some fun making the cake for your next celebration!

Wednesday, October 23, 2013

Lazy Linguine for Two

One-dish pasta recipes having been making the rounds on pinterest recently. Most serve four to six...and since there are just two of us for most meals...I decided to try a pared down version recently.  My husband is wondering when I will be serving it again! How much simpler can it get...than throwing everything into one pot and having it on the table a short while later?


  • 6 oz. linguine (half of 12 oz / 375 gr package)
  • 1 cup grape tomatoes, halved
  • 1 small onion, julienned (cut in strips lengthwise)
  • 2 cloves garlic, thinly sliced
  • 1/4 cup fresh basil leaves, chopped
  • 2 1/4 cups water or vegetable broth
  • 1 tablespoon extra-virgin olive oil, plus more for serving
  • 1/4 teaspoon red pepper flakes
  • 1/2 teaspoon salt
  • Coarse salt and freshly ground pepper
  • Freshly grated Parmesan cheese, for  serving
  1. Place pasta, tomatoes, onion, garlic, and basil in a skillet or stock pot.
  2. Add water or broth and olive oil.
  3. Sprinkle with pepper flakes and salt.
  4. Bring to a boil over medium-high heat.
  5. Reduce heat and simmer for about 10 minutes (stirring frequently)...or until most of the liquid has evaporated.
  6. Season to taste with salt and pepper, stirring to distribute juices evenly.
  7. Dish into two pasta bowls.
  8. Drizzle with additional olive oil, if desired.
  9. Garnish with Parmesan cheese.
 * Double or triple the recipe to serve four or six.


Enjoy!

Wednesday, October 9, 2013

Cabbage Rolls

There are many different versions of cabbage rolls out there. I make cabbage rolls much like those that my mom made...and we had frequently when I was growing up.  Cabbage and beef were staples at our place!  We celebrated my dad's birthday recently...and had an old-fashioned dinner together with family.  I brought cabbage rolls, or 'hallapse' as we used to call them....my simplified version.


  • 2 pounds lean ground beef
  • 2 eggs
  • two slices bread, soaked in water and then squeezed
  • 1 medium potato, sliced
  • 1 medium onion, sliced
  • 2 teaspoons salt
  • 1/2 teaspoon pepper
  • 2 cans tomato soup, divided
  • 2/3 cup long grain white rice, un-cooked
  • 2 medium heads Savoy cabbage* 
  • tomato juice
  1. Place ground beef in large mixing bowl. 
  2. Combine eggs, soaked bread, potato, onion, salt, pepper and one tin of tomato soup in blender. Process until completely smooth.
  3. Add pureed mixture to mixing bowl...along with the rice.
  4. Using your hands, mix well.
  5. Remove leaves from head of cabbage and place in large microwavable bowl. Add several tablespoons water, cover and microwave for several minutes on high, just to soften the leaves a bit.  Savoy cabbage is most flexible, and doesn't require much steaming.
  6. Form meatballs with about 1/4 cup of meat mixture. Place on center of a cabbage leaf and  roll up cabbage to enclose. Fit cabbage rolls snugly in the bottom of a roaster.
  7. Combine remaining can of tomato soup with 1 can of water.  Pour over the cabbage rolls.
  8. Cover and bake at 350°F for about 2 hours. 
  9. Check on cabbage rolls part-way through baking time and add tomato juice if  more liquids are required.
  10. Before serving, combine tomato sauce (drained from pan) with 1/2 cup sour cream and heat through.  Serve over cabbage rolls.
*If not using Savoy cabbage, I prefer to freeze the entire head in advance and then remove the leaves one at a time from the partially defrosted head of cabbage.


The cooked cabbage rolls freeze well.  Package in meal-size portions to freeze.  Thaw and re-heat in the oven or microwave. 

Monday, September 30, 2013

Pumpkin Pie Cupcakes

When I saw different versions of pumpkin pie cupcakes popping up on Pinterest...I decided to give them a try.  I adapted my tried and true pumpkin pie recipe...and we enjoyed the results.  They are like crustless mini-pumpkin pies. 


  • 1 14 oz / 398ml can pumpkin purèe
  • 3/4 cup brown sugar, packed
  • 3 eggs
  • 1 teaspoon maple flavouring (optional)
  • 1 cup whole milk
  • 3/4 cup flour
  • 1/4 teaspoon baking powder
  • 1/4 teaspoon baking soda
  • 1 teaspoon cinnamon
  • 1 teaspoon ginger
  • 1/4 teaspoon nutmeg
  • 1/4 teaspoon cloves
  • 1/4 teaspoon salt
  1. Preheat oven to 350°F.  
  2. Line muffin cups with foil  (not paper) liners or spray with cooking oil.
  3. In large bowl, combine pumpkin, brown sugar, eggs, maple flavouring  and milk. Mix well.
  4. Combine flour, baking powder, baking soda, spices and salt...and add to pumpkin mixture.
  5. Beat until smooth.
  6. Fill each muffin cup about 3/4 full.
  7. Bake for 20 minutes.
  8. Cool completely in pan before removing.
  9. Chill.
  10. Top with slightly sweetened whipped cream before serving.
*The cupcakes rise while baking and sink in the center while cooling. 

Yield: 12 large muffins.


Wednesday, September 18, 2013

Avocado Black Bean Salsa

With tomatoes still hanging on the vines...and plenty of fresh corn at my disposal...here is a salsa recipe we have enjoyed recently.  Serve with taco chips as an appetizer...as a side dish with chicken or on top of a bed of greens as a lunch salad.
  

  • 2 avocados, pitted and cubed
  • 1 14 oz./ 398 ml can black beans, drained and rinsed (about 1 1/2 cups)
  • 1 1/2 cups corn kernels (kernels from 2 ears of fresh cooked corn or 1-15 oz. can corn, drained)
  • 2 cups cherry tomatoes, quartered
  • 1/2 cup chopped red onion
  • 1 teaspoon of minced fresh jalapeno pepper (optional)
  • 4 tablespoons lime juice (2 limes squeezed)
  • 1/2 teaspoon salt
  • 1/4 teaspoon coarse black pepper
  • 1/4 cup chopped cilantro
  1. Combine avocado, black beans, corn, tomatoes, onion and minced jalapeno in a large bowl.
  2. Add remaining ingredients and toss.
  3. Chill until ready to serve.
*The amounts can be adjusted as to preference or servings required. If you don't care for the heat, omit the pepper.  


Wednesday, September 4, 2013

Peach Almond Scones

We are so enjoying the local peaches at this time of the year.  By local...I don't mean that they are grown in my neighbourhood...but that they are British Columbia peaches.  Peaches are grown in the southern areas of the Okanagan, Similkameen, and Kootenay valleys....by about 800 peach growers.  BC produces 7 million kilograms of peaches...about 20% of the Canadian production....mostly sold as fresh produce.  I'll be sad when the peach season ends.

Here's a recipe for fresh peach scones you might also enjoy!


  • 2 cups flour
  • 1/2 teaspoon salt
  • 1/4 cup sugar
  • 2 teaspoons baking powder
  • 1/2 teaspoon baking soda
  • 1/4 cup cold butter
  • 1/2 cups sliced almonds, slightly toasted, divided
  • 1 large egg
  • 3/4 cup buttermilk
  • 1/2 teaspoon almond extract
  • 1 cup diced peaches
Glaze:
  • 1/2 cup icing sugar
  • 2 tablespoons milk
  • 1/2 teaspoon vanilla
  • 1/2 teaspoon almond extract
  1. Preheat your oven to 375°F. 
  2. In a large bowl, combine the flour, salt, sugar, baking powder and baking soda.
  3. Cut in the butter, using a pastry blender...or grate with a coarse grater and combine with fingertips. 
  4. Stir in 1/4 cup of toasted almonds. 
  5. In a separate bowl, whisk together the eggs, buttermilk and the almond extract. 
  6. Stir this mixture into the dry ingredients. 
  7. Add the peaches and stir just until well-combined. (This is a somewhat wet and sticky dough, perfect for drop scones.)
  8. Drop by large spoonfuls (ice-cream scoop) onto parchment paper lined cookie sheet.
  9. Sprinkle with remaining 1/4 cup of sliced almonds.
  10. Bake until golden...15 to 18 minutes.
  11. While still warm, drizzle with glaze.
 Yield: 1 dozen large scones.

Monday, August 19, 2013

Avocado Chicken Salad for Two

At this time of year a salad is often the full meal around here.  Avocado and chicken go well together...and with fresh seasonal veggies thrown in, it's a great combo. Add a dinner roll...find some good company...and enjoy it out on the front porch!


Salad:
  • 4 cups mixed salad greens (or baby spinach leaves)
  • several slices red onion, coarsely chopped
  • 12 cherry tomatoes, halved
  • 1 cup chopped cucumbers
  • 1/2 cup corn (or kernels cut from 1 cob)
  • 1 1/2 cups cooked chicken, chopped
  • 1 avocado, halved and sliced
  • 1/4 cup crumbled feta cheese
  • Sunflower seeds or roasted pine nuts to sprinkle on top, optional

Dressing:

  • 3 tablespoons white wine vinegar
  • 2 tablespoons extra-virgin olive oil
  • 1 tablespoon liquid honey
  • 1 tablespoon Dijon mustard
  • salt and freshly ground pepper, to taste
Method:

1. Place salad greens in a large bowl. Add remaining salad ingredients.
2. In a small bowl, whisk together the dressing ingredients. Pour over the salad and toss.


Wednesday, August 7, 2013

Cooler Corn

We cook it many different ways...
usually on the grill or the stovetop.

Today I will give you another method for cooking corn-on-the-cob.
If you are expecting a crowd for dinner...
or need a simple way to cook corn while camping...
or are planning to serve corn at a family reunion...  
here is an easy way to prepare your corn.


Cooler Corn
  • Picnic cooler
  • Shucked corn cobs
  • Boiling water (several kettles)
  1. Place corn cobs in clean picnic cooler
  2. Carefully pour boiling water over the corn (to cover) and close the lid immediately.
  3. Allow to sit for at least thirty minutes...with no peeking.
  4. Serve with butter and seasonings.
The corn will keep its temperature for several hours as long as the lid remains closed. Do not drain. Perfect and simple!


Thursday, July 25, 2013

Onion Ring Special


Over the years I have collected many recipes from friends and family...and whenever I prepare that particular dish I am always reminded of the one from whom it came.  Today's recipe is a prime example.  My Aunt Kay e-mailed this recipe to me one summer...thinking it might be something we would enjoy.  And we do!  Two years ago this month my aunt passed away.  I have many good memories of her...and this salad always brings her to mind. If you love the fresh produce of summer..then here is a side dish of multi-coloured bell peppers and onions that most easy to prepare ahead and have on hand in the fridge.  So...if you have a peck of peppers that need picking...here's a recipe for you!


  • 1 large sweet onion, sliced in rings (like Walla Walla)
  • 1 red pepper, sliced in rings
  • 1 green pepper, sliced in rings
  • 1 yellow pepper, sliced in rings
  • 1 orange pepper, sliced in rings
  • 1 1/3 cups sugar
  • 1 1/2 teaspoons salt
  • 1 1/3 cups white vinegar
  • 1/2 cup water
  • 2 tablespoons oil
  1. Thinly slice all the vegetables and place in large salad bowl with a lid.  
  2. Combine sugar, salt, vinegar, water and oil in a saucepan.
  3. Bring to a boil, stirring to dissolve sugar.
  4. Pour over veggies.
  5. Cover and chill for at least 24 hours. 
  6. Serve as a salad or a meat condiment.
 

Monday, July 15, 2013

Smartie Cookie Pizza

It is simply a giant cookie...also called a cookie pizza or a cookie-cake.  It's a fun dessert for all ages...is easy to transport to a party or picnic or to give as a gift.  Write a message on it with icing and serve it for any occasion.  We took one to a picnic at the lake awhile back...and it doubled as a birthday cake for our granddaughter. Have fun with it!  


Ingredients:
  • 1 cup butter or margarine
  • 1 1/2 cups brown sugar
  • 2 eggs
  • 2 teaspoons vanilla
  • 2 1/2 cups all-purpose flour
  • 1 tsp baking soda
  • 1 tsp salt
  • 2 cups semi sweet chocolate chips
  • Smarties or M and M's to decorate
Instructions:
  1. Preheat oven to 350° F. 
  2. Line a 14-inch round pizza pan with a circle of parchment.
  3. Cream butter and sugar with mixer until smooth. 
  4. Beat in the eggs and vanilla. 
  5. Add flour, baking soda and salt together. Mix until smooth.
  6. Fold in chocolate chips.
  7. Put the dough into the pizza pan and press it into a circle...leaving a generous 1 inch gap around the rim.
  8. Press smarties into the top...as desired.
  9. Bake on center rack for 20 minutes or until cookie is golden and set.

Sunday, July 7, 2013

Instant Raspberry Frozen Yogurt

This is so simple, it can hardly be called a recipe.  It is rather like 'cheater ice-cream' and really hits the spot on a hot day.  All you need is frozen berries and Greek yogurt.  Simple and delicious!


  • 2 cups / 500 grams Greek yogurt
  • 2 cups frozen raspberries
  • 2-4 tablespoons sugar (or to taste)
  1. Put yogurt into food processor (or good quality blender).
  2. Add frozen berries and sugar.
  3. Blitz until blended.
  4. Serve immediately. 
Serves 4.
 

Saturday, June 29, 2013

Camping Fare

Summer is upon us...and many of you are likely off camping this weekend.  I am out in the Canadian Rockies...enjoying the scenery, the company and the food...of course!  What's a camping trip without good food?  There's nothing like combining food and fire and cooking up some great campfire treats.  I'm going to share with you a few of our family favorites...things we like to cook over the fire with the grands.

Everyone loves s'mores.   But not everyone knows that s'mores are made so much simpler with the use of  buttery biscuits topped with the perfect layer of melt-in-your-mouth milk chocolate. I usually use Petit Écolier biscuits...but recently have been using Celebration brand.


Roast your marshmallow to perfection.  Sandwich it between two cookies...and enjoy a classic campfire dessert with a bit of a twist.  When I purchased a a package of the cookies and marshmallows this week...the cashier asked if I was planning to put the two together.  I explained how they made great s'mores.  She thought that was the most brilliant idea...and was going home to give this method a try!  So...in case you have never made s'mores this way...I thought I'd pass along the tip.

Banana boats are always a hit...for all ages.


Stuff a banana (skin on) with toppings of your choice (things like peanut butter, chocolate chips, and marshmallows)...wrap in heavy foil and roast over an open fire.  After about five minutes...un-wrap and enjoy the ooey-gooey goodness right out of the boat.  Ice-cream and chopped nuts are always a nice addition!  For detailed instructions...you will have to check out the recipe in the Celebrations cookbook on page 133.

Another camping favorite  is the 'bush pie'. A bush pie is basically bread stuffed with a filling of your choice...and then cooked inside a cast-iron bush pie maker (available at any sporting goods store).


We used pizza toppings inside our bush pies...and cooked them two at a time inside a double bush-pie-maker.  Our grands love them!  We have also tried the dessert version...which is filled with any pie filling or Nutella and bananas.

For breakfast...or anytime...try cinnamon snakes.


Cover the wiener sticks with tinfoil...then wrap long strips of dough around the foiled end (we used refrigerated Pillsbury crescent dough) and roast them over the open fire until golden. Brush the cooked 'snake' with butter and roll in a cinnamon/sugar mixture.  So good!


And here is a favorite camping lunch that doesn't even need a fire!  Walking Tacos are always a treat. Purchase the single-serving size nacho chips...slit the bag...and make up your nacho plate right in the bag. Again...complete instructions can be found on page 135 of the Celebrations cookbook.
 
And those are the Saturday tips for this week...a few campfire food ideas while the season is upon us.

Have a wonderful weekend!